Developing the Course Site Generator App
HW 1: 1st Technology Learning Assignment - GUIs, JSON & .xml Files
The Big Picture
This semester you will be creating an application for creating academic course sites similar to this one. The program will let the user select how many pages their site should have and then what sections of content should appear on the site. In addition, we'll build a modular system for adding dynamically loaded content for things like the course office hours grid and schedule. The application will generate the necessary HTML and complementary JSON files for loading such dynamic data. Note that you will be provided with all JavaScript necessary. Before you start you might want to become famililiar with how office hours are loaded dyanimcally using JavaScript from a JSON file to build this course's syllabus page. Examine the source code, examine the JavaScript, examine the JSON file. This is your life for the semester. This will be a semester-long project, so before we code our solution, we first will have to learn all about the necessary technologies to use. This is a common first step in Software Engineering, so get used to it. We will then design our solution, and then code. The HWs are divided up as follows:
- HW 1 - 1st Technology Learning Assignment - GUIs, JSON, & XML: In this assignment you will learn about building a GUI using the Java programming language, including JavaFX. In addition, you will learn a bit about building and using frameworks, as well as using data formats like the eXtensible Markup Language (XML) and JavaScript Object Notation (JSON) formats.
- HW 2 - 2nd Technology Learning Assignment - 2D Rendering & Multithreading: Here you'll learn about using JavaFX to render basic shapes as well as how to employ multithreading as well as using a Transaction Processing System. You will also do some more generation of Web content (i.e. HTML, CSS, JavaScript) using Java.
- HW 3 - UML Design: Now you'll design all of your classes for your application using UML class and sequence diagrams. You will specify all necessary class and instance variables and methods, as well as the relationships between all classes and the results of all triggered events.
- HW 4 - Implementation Stage 1: In this stage you'll start constructing your application and setup all test beds.
- HW 5 - Implementation Stage 2 - Here you'll continue implementation, including the completion of a framework for managing certain application data.
- Final Project - Course Site Generator - In this assignment you will complete the project.
Building Java Libraries (JAR files)
In this assignment I'll be giving you a whole heap of code in three separate NetBeans projects to start with, so you'll have to get used to figuring out how other people's code works. In fact one of the primary reasons this course exists is to encourage code literacy in our students. Note that all code provided should compile and run as-is, but it is incomplete. To get the Office Hours application up and running do the following:
- Download the assignment - Save the zip file to your computer in a directory where you wish to work and unzip it. Inside you should find the CS3LearningSuite_v2.0 directory and inside you'll find the apps and libs directories. Inside these directories you'll find the following four projects, which you should now open using the NetBeans IDE:
- ./apps/OfficeHours - this NetBeans project is the application for editing Teaching Assistant office hours using two tables. Note that most of the changes you'll make in this assignment will happen here. Also note that it contains directories with all the application's data and images to be used for loading and running the program. You will want to make yourself familiar with all the details of how these pieces fit together ASAP.
- ./libs/DesktopJavaFramework - this project serves as a framework for making basic JavaFX applications. Note that it contains base classes for implementing a fully functioning app and it provides a core set of services that help in making desktop applications. This will serve as the base framework for our applications this semester. Note that you will need to fully understand this framework in order to complete the assignment. You are permitted to make changes as needed.
- ./libs/jTPS - this framework provides a Transaction Processing System (TPS) that can be used by any Java application for managing an Undo/Redo system.
- ./libs/PropertiesManager - this framework provides the means to load application properties from XML files, which is particularly useful for loading language-specific text as needed.
- javax.json-1.0.4.jar - this framework is provided by Oracle and provides a means for reading and writing JSON files. Note that this is just an already built JAR file and there is no corresponding NetBeans project for you to open.
- ./apps/OfficeHours - this NetBeans project is the application for editing Teaching Assistant office hours using two tables. Note that most of the changes you'll make in this assignment will happen here. Also note that it contains directories with all the application's data and images to be used for loading and running the program. You will want to make yourself familiar with all the details of how these pieces fit together ASAP.
- Build the PropertiesManager Library - The PropertiesManager library will be used by other projects, so let's build that first. Right-click on the PropertiesManager project and select Build. After building look inside the PropertiesManager/dist directory. There you should find a file named PropertiesManager.jar.
- Build the jTPS Library - do the same thing for the jTPS project.
- Build the Desktop Java Framework Library - this is the last framework to build. Once this has been built all library JAR files will have been created and so there should be no compiler errors.
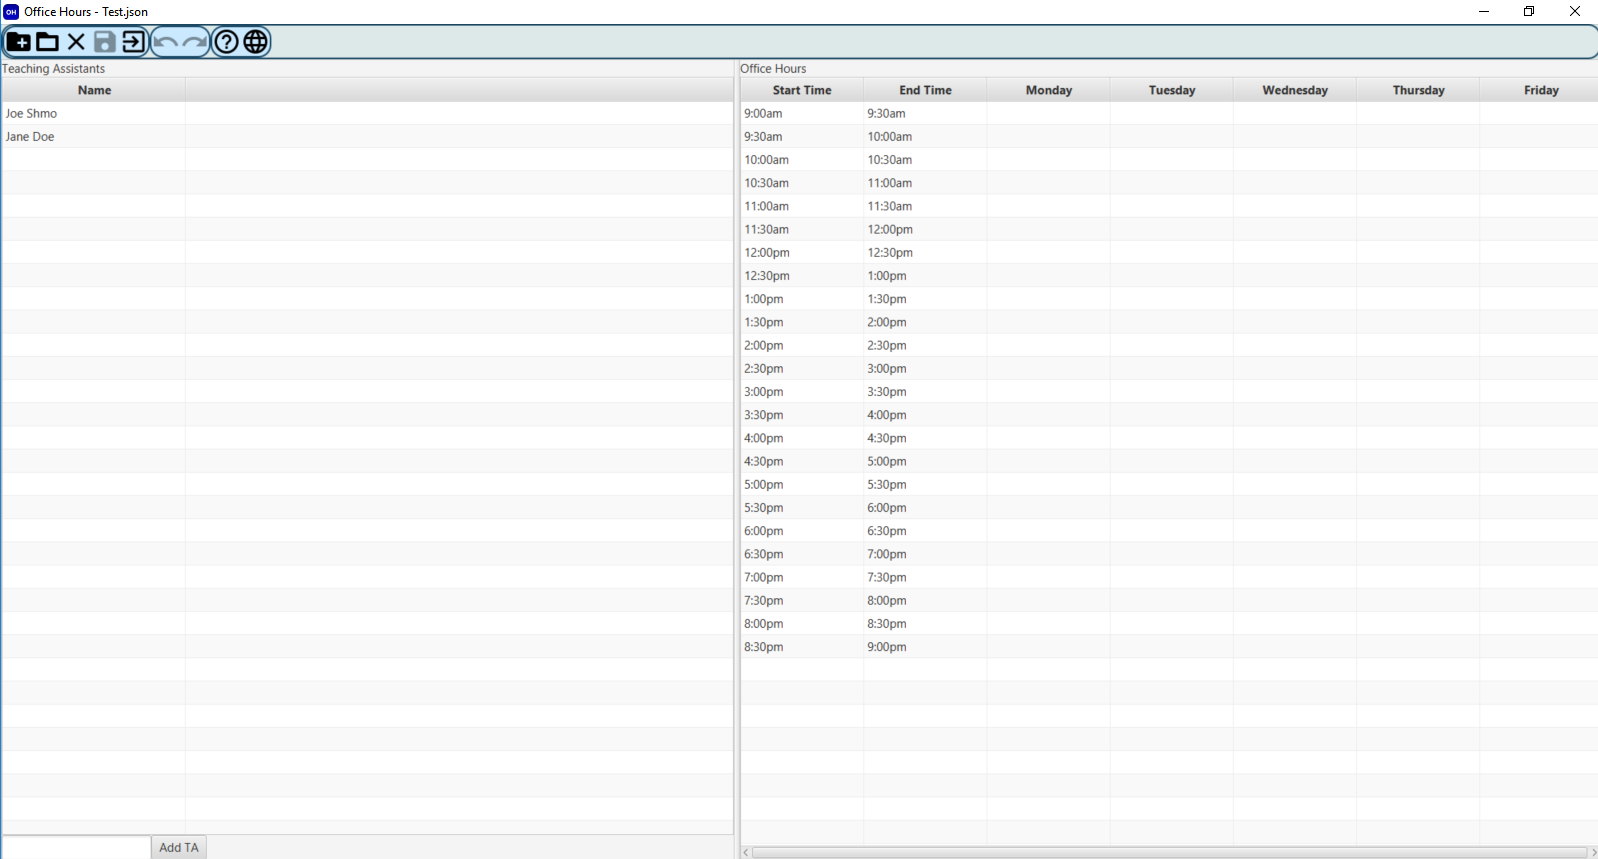
- Build and Run the Office Hours application - We're almost there. Now that the OfficeHours project can find all the needed libraries we can build this project. After it's built, it can be run, since it contains the OfficeHoursApp class (it has a main method). When you run it, you should get a welcome dialog and when you enter the main workspace you should get a UI that looks like the one below. Note that some interactions work. You can click New for example and start editing a To Do List, but it currently does nothing else. This is where you come in.
Time to Break Out the Debugger
This semester we will be encouraging use of NetBeans' Debugger, I can't emphasize enough how important it is for you to become comfortable using this tool. It will save you hours of time when looking for errors in your code. It is also a useful tool for learning about how other people's code works. Let's start by learning a little bit about what's going on in the projects you've already opened. Go to the OfficeHoursApp class' main method and put a breakpoint on the first line of code in that method. Then go to the AppTemplate class' start method (found in the Desktop Java Framework) and put another break point on that first line of that method. These breakpoints will pause execution of your program so you can inspect data as it changes.
Now, right-click on the OfficeHoursApp file and select Debug File. The program will start up and freeze on that first line in the main method. Note we are not interested in jumping into the launch method as it will wind through miles of Java API code. But have no fear, we already put a breakpoint in AppTemplate's start method. So, press Continue and it should lead you there. Now you should step through, one line at a time, the complete initialization of the application, stepping into all method calls to get a complete mapping set in your mind. This is an important first step in any development project where you are using an established code base. You want to know how everything fits together so that you may effect the right change.
So proceed to Step Into anything and everything you encounter. Note that AppTemplate extends JavaFX's Application and really starts the initialization of our project inside its start method. Now, slowly but surely click the Step Into button continually to watch our application code execute. Step out if you end up in Java API code. Note that while stepping through, you may mouse over variables to see their values, or you may view the Variables tab to see them change live. You are now on your way to being a Software Engineer.
So what's XML?
XML stands for the EXtensible Markup Language, which is very similar looking to HTML, but which is used for a variety of things, not just representing Web pages. One common use of XML pages is to store data, which is how we'll be using them. Why use XML to store data? The short answer is because everyone else does. The long answer is because it's a w3c standard, it uses a simple, platform-independent plaintext format, and well, because everyone else uses it. Find the app_properties.xml file in the application's data directory and examine its contents. You'll notice it has all the textual cues your program will require. This makes it easy for us to change the language our program uses if need be, just change this file.
Then what's JSON?
JSON stands for JavaScript Object Notation which is another popular Web format for storing data. In fact, it is starting to replace XML in many respects. Note that we'll use both of these formats as they are things you should become familiar with. While we will read from XML files, we will both read and write from/to JSON files. We'll store the work that our program produces inside the work directory. Go there and find the CSE219TAs.json file there and examine the contents and structure of this file. Note that this is similar to the format used by our course syllabus for loading the office hours grid.
Office Hours App - Required Functionality
Learn as much as you can about how the code I've provided works. Can you figure out what the point of the framework really is? Can you figure out how all the pieces fit together? Once you feel comfortable with how all of this code is organized and classes relate to each other you'll have to figure out how to provide the following additional functionality. Note, this may require some editing of the framework, but will definitely require much editing of the custom app project. To complete this application, do the following:
- Add TA Email Addresses - at the moment, the user interface only has a name field for the teaching assistants. We want to provide a means for entering a textual email address as well. Note that a TA email address should be listed properly in the TA table, but is not needed for the office hours grid. Note that you should employ Java's Regular Expressions library to ensure the email entered by the user is valid. Note that that you may employ code from this Stack Overflow Discussion on how to do so.
- Add a Second Language - Currently the application only works in English. Add a second language (note, you'll need an additional XML file) such that one can choose between English and the language of your choice. Note that you'll need to provide all labels, prompts, and messages in that second language (just use Google translate if you don't speak another language).
- Add Name & Email Text Field Prompts - text fields these days typically provide ghosted prompts inside that tell the user what they are to enter. Add this as a feature in part through the Desktop Java Framework (i.e. update this framework) such that such prompts can also provide language independence and can be loaded from the language-dependent XML files in a uniform way.
- Add Time Slots Column - add another table to the Teaching Assistant table that will count the number of time slots each TA has been assigned to. A time slot is a 1/2 hour block in our office hours table.
- TA Office Hours Toggle - currently the user may add a TA and then select a TA and then click on the office hours on the right but nothing happens. Change the program such that when you click on a cell in the table on the right it will add (or remove) that TA name to that cell and increment (or decrement) the number of time slots assigned for that TA.
- Undo/Redo - all actions that change the nature of the data, like adding TAs and changing office hours, should be undoable and thus redoable. This means you'll need to employ the jTPS library for this.
- Saving & Loading - note that all the changes we've noted should take hold when the user saves/loads files, including TA email addresses. The user will still be saving/loading to/from JSON files. Saved files must use the same file format as CSE219_TAs.json, which you should examine and try to figure out.
- Workspace Stylizing - below is an example of how the application should look once the CSE219TAs.json file is loaded. Update the workspace colors, fonts, and spacing to get your application looking like it. You should try to get exactly the same fonts, color, etc. Note that you'll be using CSS for much of this.
- Failure Feedback - note that when the user tries to add a new TA they must make one that has both a unique name and unique, valid email. Should they fail in either task they must be notified of why what they did was wrong. Provide a message dialog telling them when they provide illegal input.
- Fool Proof Design - One of the best ways to prevent the user from doing illegal operations is to enable/disable controls in order to prevent the user from having illegal options. So, make sure that your application employs this approach. This means disable the Add TA button if there is no text in either the name or email text fields, for example.

And that's it! Note that there are a number of things we haven't done, like we have no mechanism for changing TA names or removing them, but don't worry about that for now. You'll need to look through a ton of my code to figure out what's going on here, but in fact, you don't have nearly as much code to write as I have provided. Don't take the assignment lightly, however. When dealing with a large code base like this, everything takes time. Also, try to understand as much as you can about all of my code as well, since you'll want to use much of it later in your future app designs.
Version Control (Subversion/GIT/Mercurial)
You are now at the stage in your career as a software developer where you should always use version control software for everything you develop. As such, you are required this semester to use Bit Bucket to keep track of your work. With such a tool, every time you make significant changes to your project, you should commit your changes to your repository, which will manage your work. You should also provide textual descriptions of all changes with your commits so that you can follow your own progress.
Finally
Remember, one of the most important principles for you to learn this semester is to plan, then do. You must learn how all of the code works and why it is arranged as is before starting, and you must plan your approach before coding. Don't just march off to the north pole in your underwear and hope for the best. Note that course demonstrations of my solution are being given during lecture.
Handin Instructions
When you are done, zip up the entire CS3LearningSuite_v2.0 directory and submit that single ZIP file via Blackboard.
Grading
Note that grading will be based on program performance and will only be done by appointment with each student's prescribed Teaching Assistant. This part of your grade will be based on how well your program performs specific required tasks. Proper use of version control will also be considered.